Reporting
Getting started
Unlike the previous reporting whereby it was strictly only one report to one shift only, this new system enables you to have as many reports as required per shift, staff, staff tag, or completely not assigned to anything at all.
.PNG)
So, to get started adding a new report you now need to click on 'Add New' and then give your Report a name. This name will be seen by the staff in their staffarea.

Adding a report using a blank new survey
If you don't have a survey template to use for your new report, you can select to Create from scratch. This will enable you to build a new survey just for this report.
.png)
You can add your survey upon completing this initial setup on this page and then going to Options > form builder
.png)
To see how to use the form builder, go to the section Using the form builder below.
Adding a report using an existing survey template
If you have a survey template already created to use as your survey simple select Use survey template. You then have the option to select a template to use. There is also a View button so you can view the template just to make sure it is the right one.
.png)
Also, note that you can adjust the survey if required upon completing the initial setup on this page and then going to Options > Form builder. Adjusting this instance of the survey will not adjust the template.
To see how to use the form builder, go to the section Using the form builder below.
Assign a report by campaign
Should you want to assign this report to a campaign you can do so by selecting 'By Campaign' under 'Assign report'.

This will assign the campaign to each shift in that campaign as the system worked before, 1 survey to 1 shift. The benefit now is that you can have multiple reports added to the same campaign.
You now have more permissioning options to complete as part of this report type:

- Give access by staff tag - if you want to limit who can see and fill out this report by staff tags add the tags required in here
- Give access by staff role - if you want to limit who can see and fill out this report by staff roles add the roles required in here
- Give access by staff - if you want to limit who can see and fill out this report by exact staff add the staff required in here
If you need the report to be available at a certain time you can do this in the 'Availability' section. These exact options are only available for this type of report.
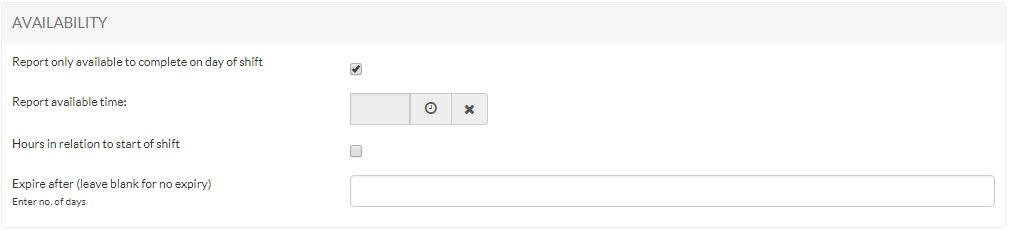
- Report only available to complete on day of shift - select this if you just want the report to be only able to fill out on the actual day of their shift. The next options (points 2-5) will then become visible.
- Report available time - Enter a time here for an exact time of day for the report to become available
- Hours in relation to start of shift - Tick this to enable the report to become available after a certain amount of hours after their shift start time. Point 4 below will them become available to you.
- Enter no. of hours - This is where you specify the number of hours in which the report will become available from the start of their shift
- Expire after - Enter the number of days in which the report will expire and dissappear after the shift date. Leave this blank for the report not to expire.
Assign a report by campaign tags
This option is not yet available.
Assign a report by staff
This will assign one report to fill out only to each person added. This would be useful for such things as appraisals.
You have the following options:
- Select staff - Add the staff required to view and fill out this report.
- Publish date - Date in which the report is available to the staff.
- Expiry date - Date in which the report is no longer available to the staff.
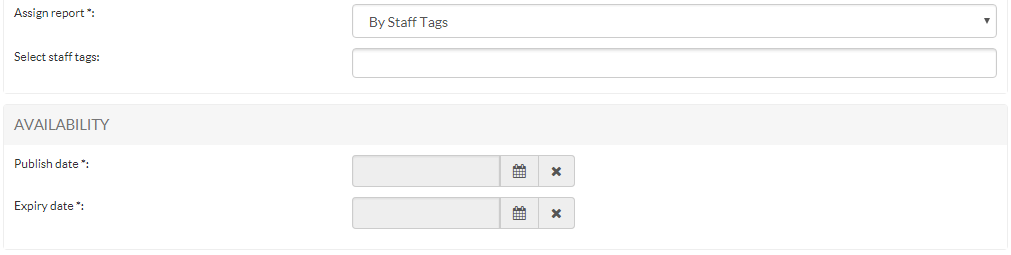
Assign a report by staff tags
This will assign one report to fill out only to each person within the staff tags added.
You have the following options:
.PNG)
- Select staff tags - Add the staff tags required to view and fill out this report.
- Publish date - Date in which the report is available to the staff.
- Expiry date - Date in which the report is no longer available to the staff.
Unassigned report
This will create an open, unassigned survey, whereby you can copy and paste the link to anyone to fill out. Such a report could be useful for this link client feedback. It will not require a username or password to see and complete.
.PNG)
The URL will be taken from the report name added. Then simply copy the link and send.
Note that in order for the URL to become active you must press submit on the setup page.
Notifications to staff
For all reports, apart from unassigned, you have the ability for the system to notify staff when the report is available, and should be completed.
.PNG)
Simply select the notification methods required and the staff will be notified according to the availability of the report.
Using the form builder
Once you have done the initial setup of a report you can now add the survey to it, or if you used a survey template you can make any adjustments neccessary. Go to 'Options > Form builder'

The form builder is quite straight forward to use. Here are some key points:
- Standard form elements - You have the standard elements that are available to you on the right under the 'General' tab
- Predefined form elements - You also have some predefined elements under the 'Predefined' tab on the right.
- Adding form elements to you survey - To add these to you from you can click on the arrow that points to the left or drag and drop them to the right.
- Editing a form element - When you have your questions added to the left each will have a set of of options that you can edit by clicking on the blue square buttons.
- Deleting a form element - You can delete an added form element by clicking on the red square cross icon.
- Cloning a form element - You can clone a form element by click on the green square icon.
- Reordering form elements - You can reorder simply by dragging and dropping into the correct order.
Upon finishing your form please press submit.
Publishing your survey
When you have added your report and finishing the survey you must now ensure that the report is published. To do this click on 'Inactive' to make it 'Active'. You can deactivate again at any time.

Locking your survey
We have added a new option that enables the person who created the report to lock it, thus ensuring that only the person that created it can amend it.
.PNG)
Deleting your survey
You can delete a survey only if no reports have actually been submitted, if they have you will not be able to remove.

Approving submitted surveys
Once surveys are submitted they can still be published to the client reporting section by clicking here:
.png)
You will then see the list of reports that have been submitted:

You can now firstly edit each to make sure they are ok for client eyes and then save. Then change the report status from 'Inactive' to 'Live'
Should you need to send the report back to the staff to add more details, you can click on the 'Reopen' button.
View and download charts, photos and data
You now have a button to take you to the Client area tpo download the data, view and download charts and graphs and also see the photos.
.png)