Live Chat
LiveChat overview
Overview
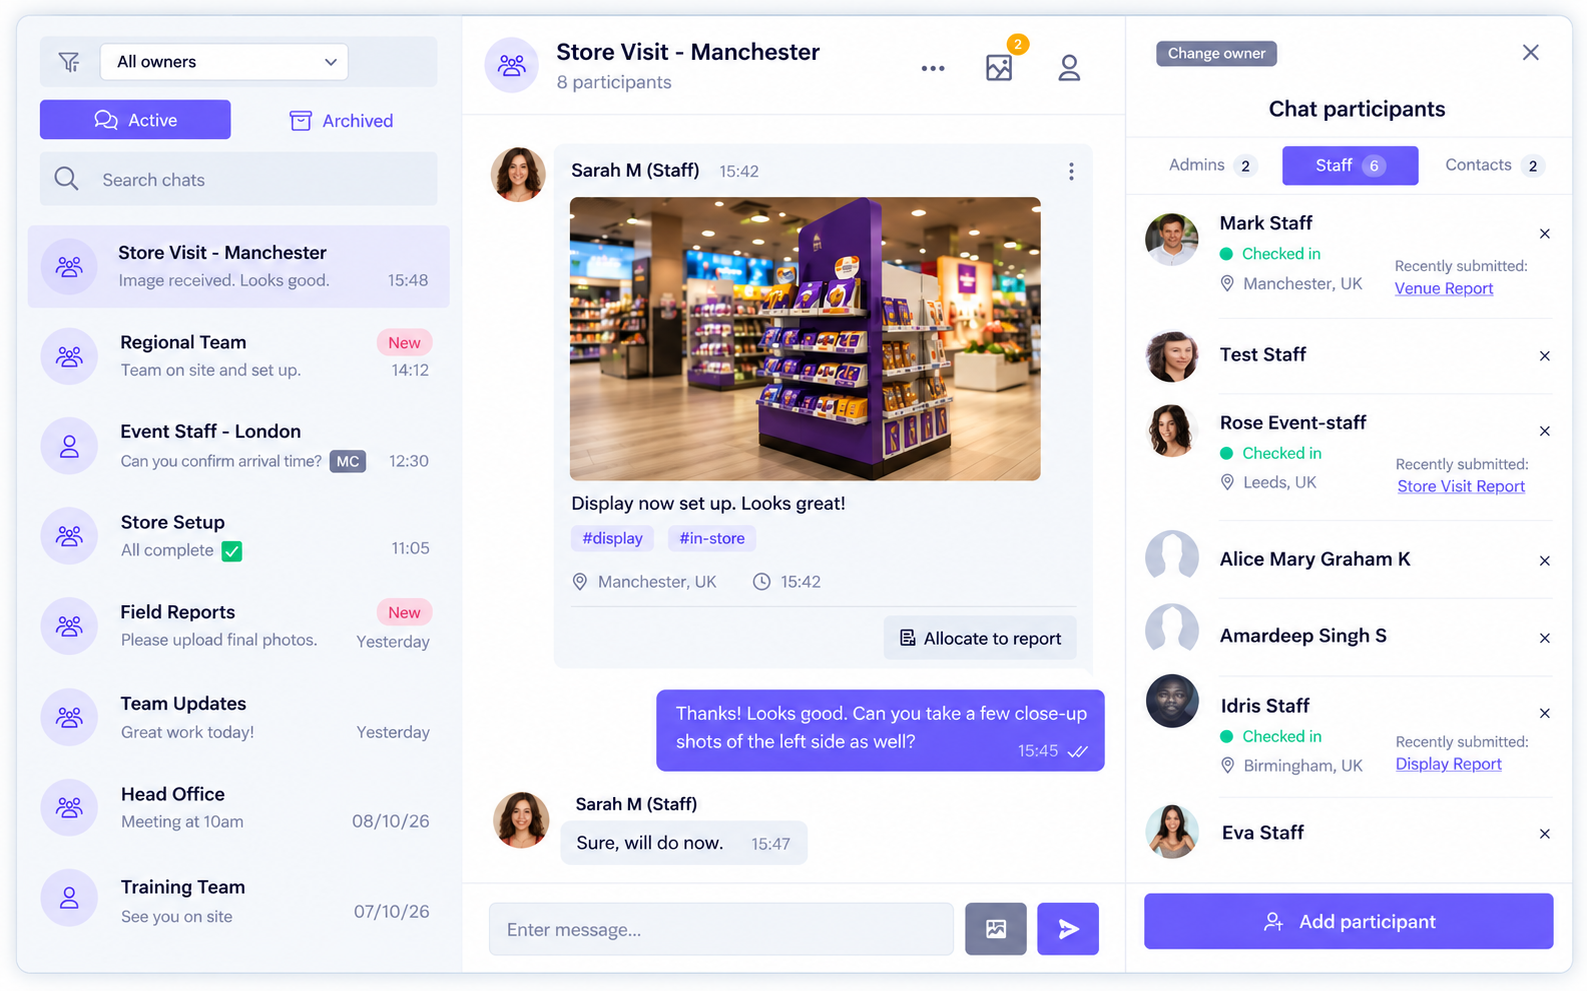
Live Chat provides a centralised communication hub within WiseOS, allowing users to communicate in real time with staff, administrators and other participants.
Users can create individual or group conversations, exchange messages, share photos and media, and monitor activities across multiple locations, jobs and events.
The interface is divided into three main sections:
- Left Sidebar – Displays active and archived conversations, with options to search for chats and filter conversations by ownership.
- Chat Window – Displays messages, shared images and conversation history. Users can send messages, upload media and allocate shared images directly to reports.
- Right Sidebar – Displays chat participants, including administrators, staff and contacts. Where available, users can also view staff check-in status, locations and recently submitted reports.
Access to conversations and available functionality is determined by user permissions.
Creating Live Chat Groups
To Live Group Chat with staff on a job
- You can add staff to a Group Chat in one of three ways
- Shifts page
- Go to the Shifts page for the job
.png)
- Go to By location tab and select the staff to add to a chat group
.png)
- Go to With Selected > Chat
.png)
- Go to the Shifts page for the job
- Staff profile
- Use the Add to chat button in the top right
.png)
- Use the Add to chat button in the top right
- Shifts page
- You can now add these participants to a Group Chat
.png)
- To add participants to an existing Group Chat select it from the dropdown
- To create a new Group Chat select New Chat in the dropdown and create a new Chat name
- Press OK
Chat Navigation - Left sidebar
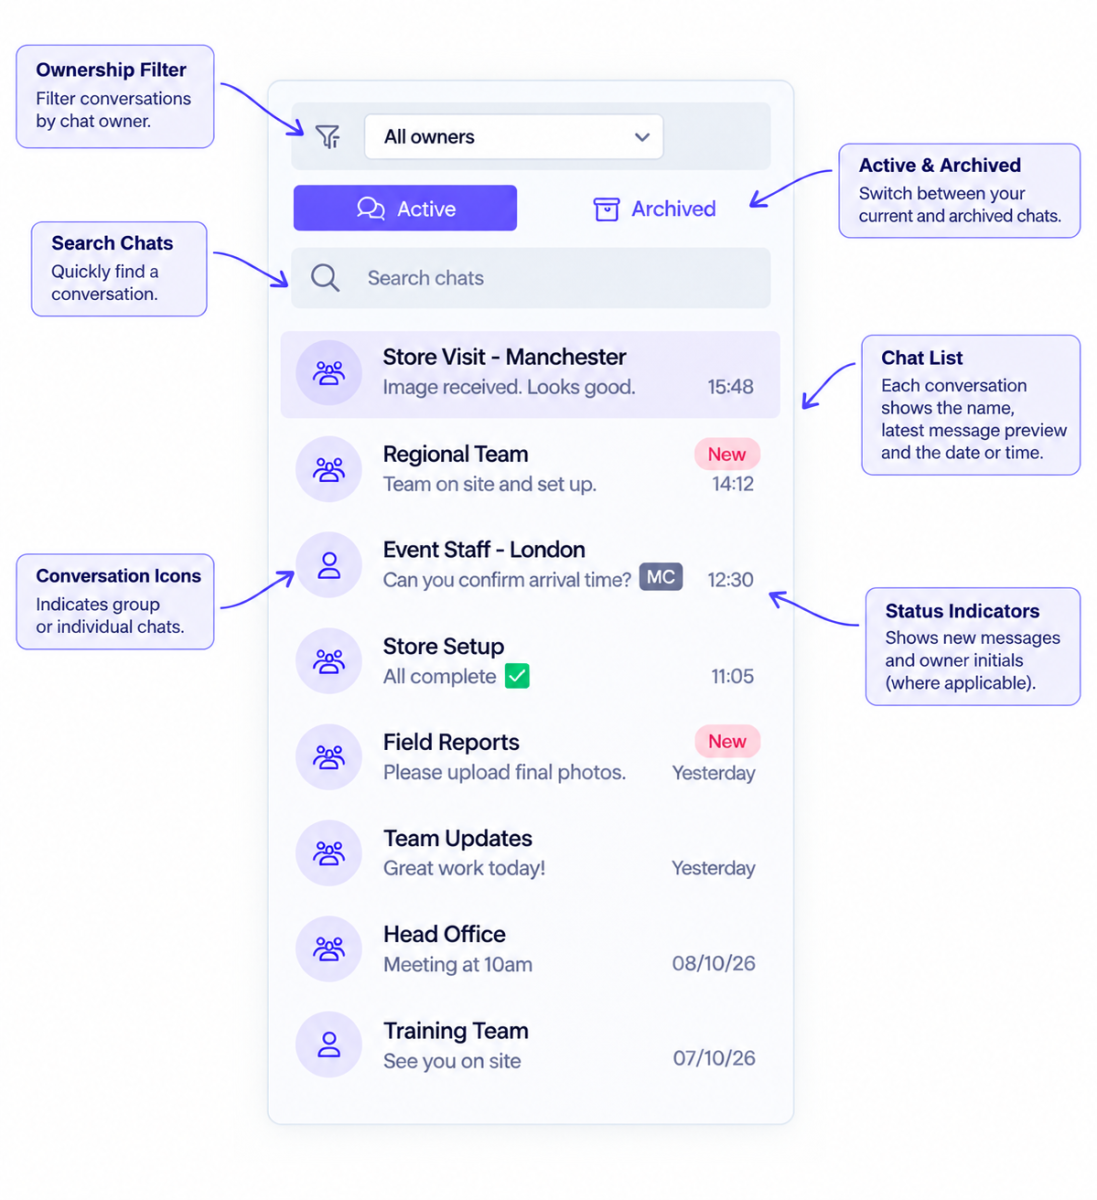
The left sidebar provides quick access to your conversations, allowing you to find, filter and manage chats from one central location.
Ownership Filter
Use the filter at the top of the sidebar to display conversations based on chat ownership. This allows you to focus on chats assigned to specific owners or view all available conversations.
Active & Archived Chats
- Active - Displays your current conversations, including individual and group chats.
- Archived - Displays conversations that have been archived and removed from the active chat list.
Search Chats
Use the search bar to quickly find a conversation by its name.
Chat List
Each conversation displays its name, a preview of the latest message and the date or time of recent activity.
Additional indicators may appear alongside conversations:
- New - Highlights conversations containing new or unread activity.
- Owner Initials - Identifies the assigned chat owner.
- Chat Icons - Distinguish between individual and group conversations.
Selecting a conversation opens it in the main chat window, where you can view messages, share media and communicate with participants.
Chat Window - Messaging
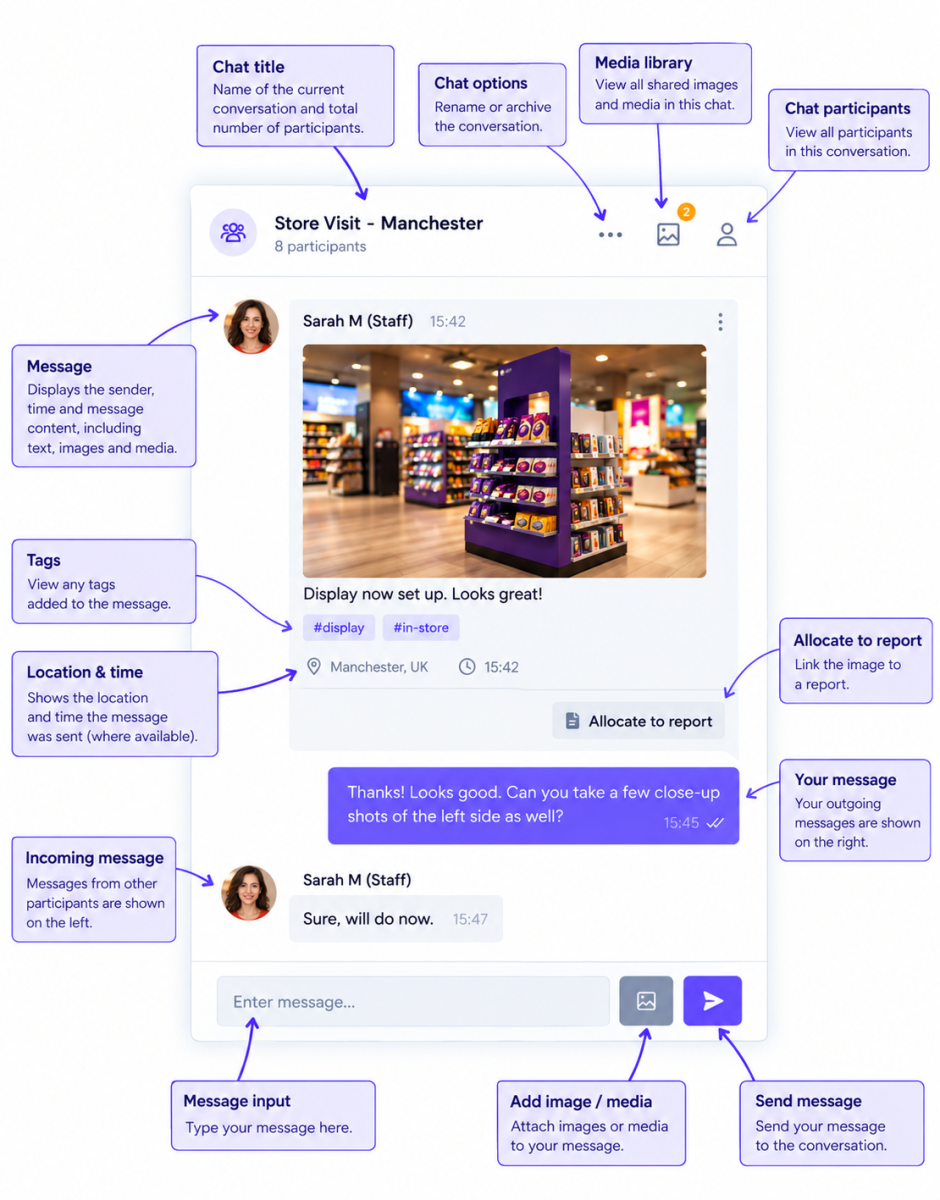
The Chat Window is the central area of Live Chat, where users can communicate with participants, exchange messages, share media and review conversation history.
Chat Header
The header displays the conversation name, number of participants and the following options:
- Chat Options – Select the three-dot menu to rename or archive the conversation.
.png)
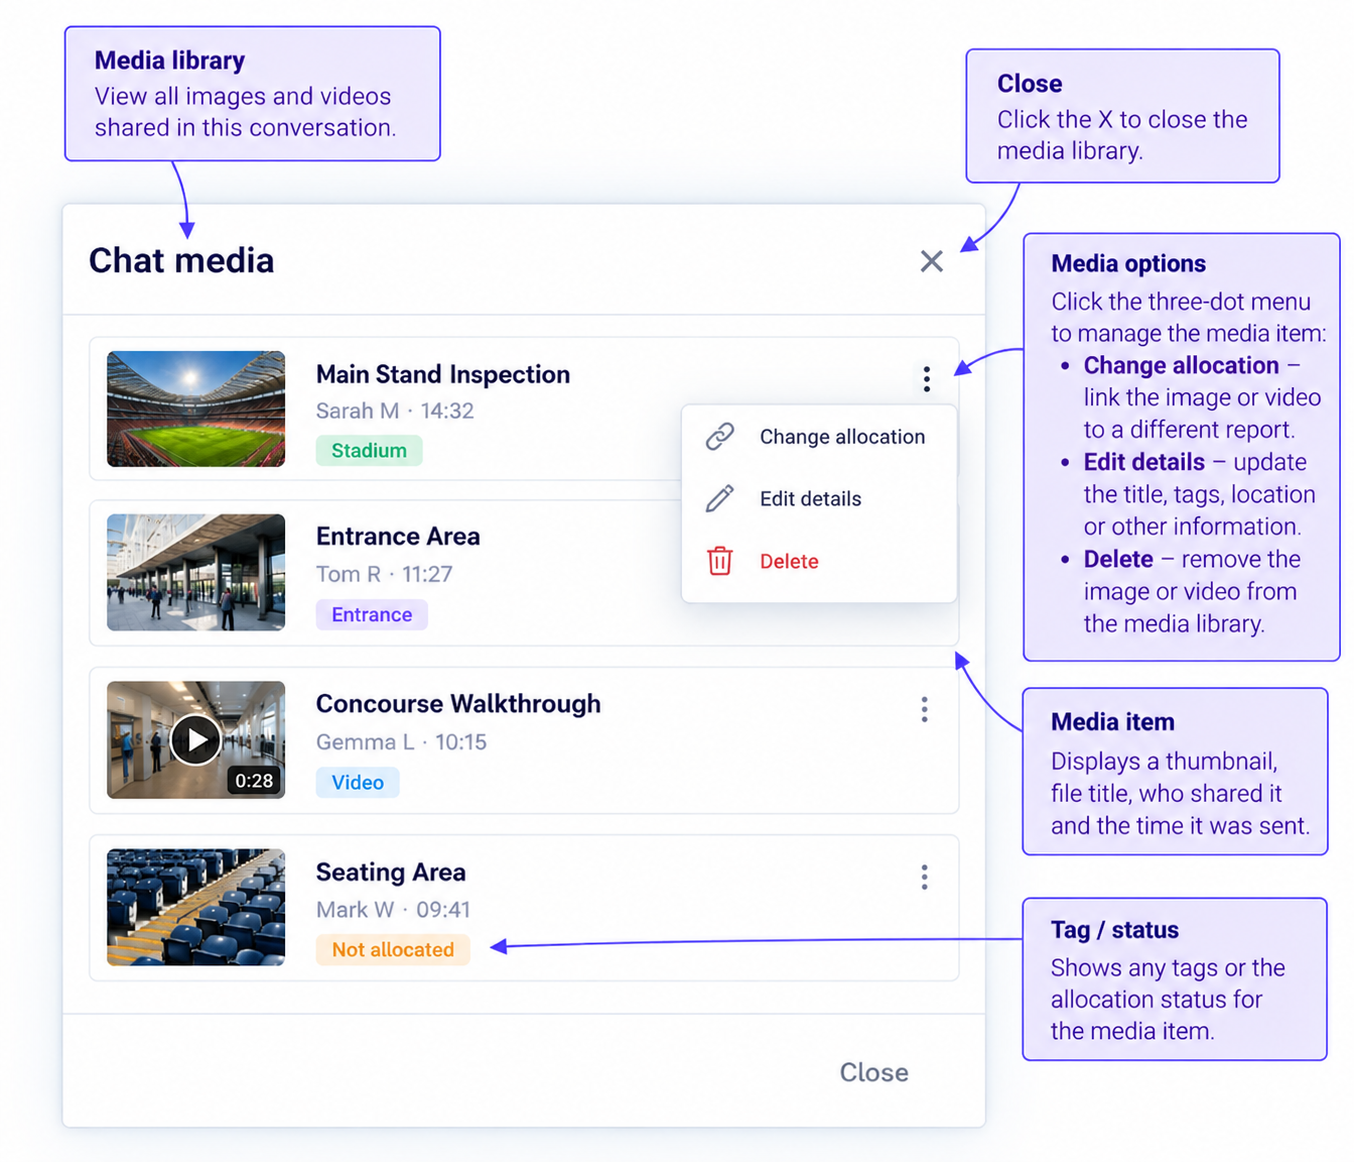
- Media Library – View images and media shared within the conversation. A notification badge indicates new media.
- Chat Participants – Show or hide the participant panel on the right-hand side.
.png)
Messages & Conversations
Messages are displayed in chronological order, with incoming messages on the left and your outgoing messages on the right.
Each message includes the sender's name and timestamp, making it easy to follow conversations and identify who has shared information.
Shared Images & Media
Images shared within a conversation can include additional information such as descriptions, tags, locations and timestamps.
- Allocate to Report – Select this option on a shared image to allocate it directly to a report, allowing photographic evidence to be incorporated into reporting without requiring a separate upload.
Sending Messages
- Enter Message – Type your message into the text field at the bottom of the chat window.
- Add Image / Media – Select the image icon to attach media to your message.
- Send Message – Select the send icon to share your message with the conversation participants.
All messages and shared media remain accessible within the conversation history, subject to your permissions.
Adding Images & Media
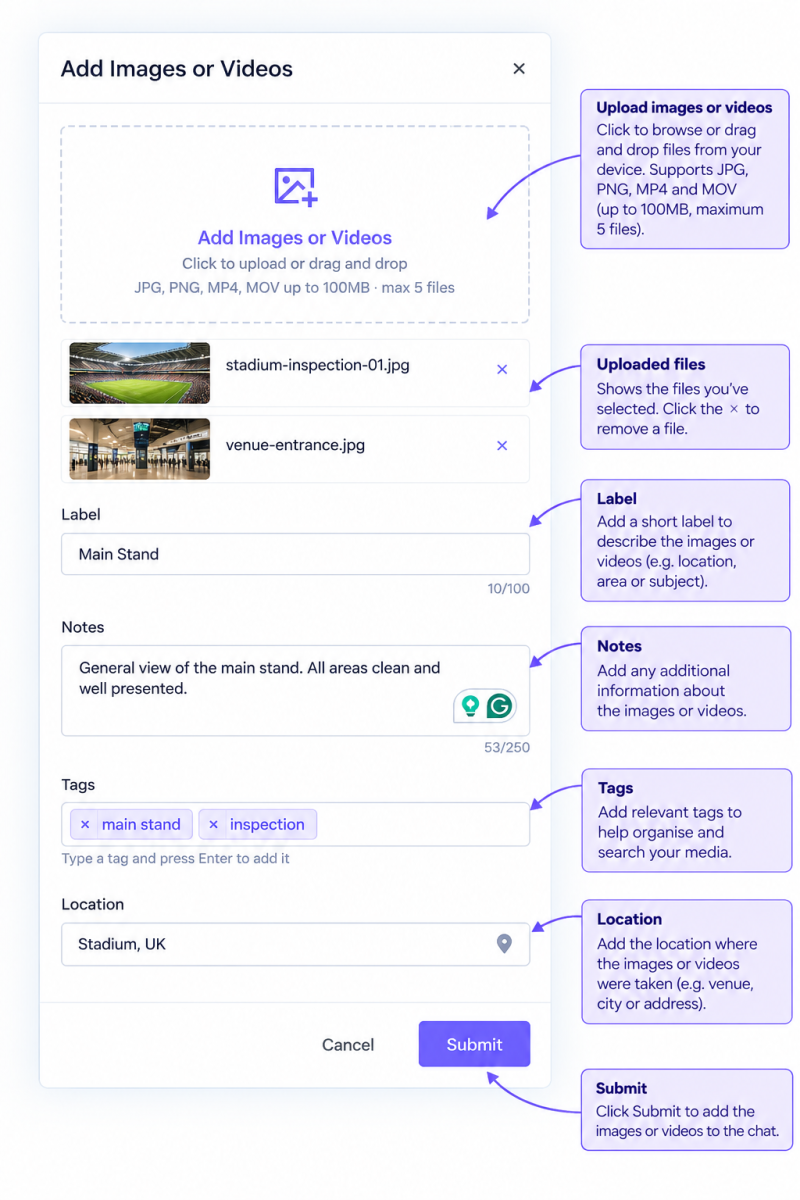
Live Chat allows users to upload and share images and videos directly within conversations, providing a convenient way to share updates, photographic evidence and supporting information.
Uploading Images & Videos
Select the image icon beside the message field to open the Add Images or Videos window.
- Upload Files – Click the upload area or drag and drop files directly into the window. Supported formats include JPG, PNG, MP4 and MOV, with a maximum file size of 100MB and up to 5 files per upload.
- Uploaded Files – Review your selected files before submission. Select the X icon alongside any file to remove it.
Adding Media Details
Users can include additional information to provide context and make shared media easier to identify.
- Label – Enter a short description identifying the image or video, such as "Main Stand Inspection".
- Notes – Add supporting information, observations or inspection findings relating to the uploaded media.
- Tags – Add relevant keywords to help categorise and identify media. Type a tag and press Enter to add it.
- Location – Specify the location where the images or videos were captured, such as a venue, stadium or site address.
Submitting Media
Once the files and supporting details have been added, select Submit to share the media within the conversation.
Uploaded media will appear in the chat history and can also be accessed through the conversation's Media Library.
Where applicable, shared images can be allocated directly to reports, allowing photographic evidence to be included in reporting activities.
Chat Participants - Right Sidebar
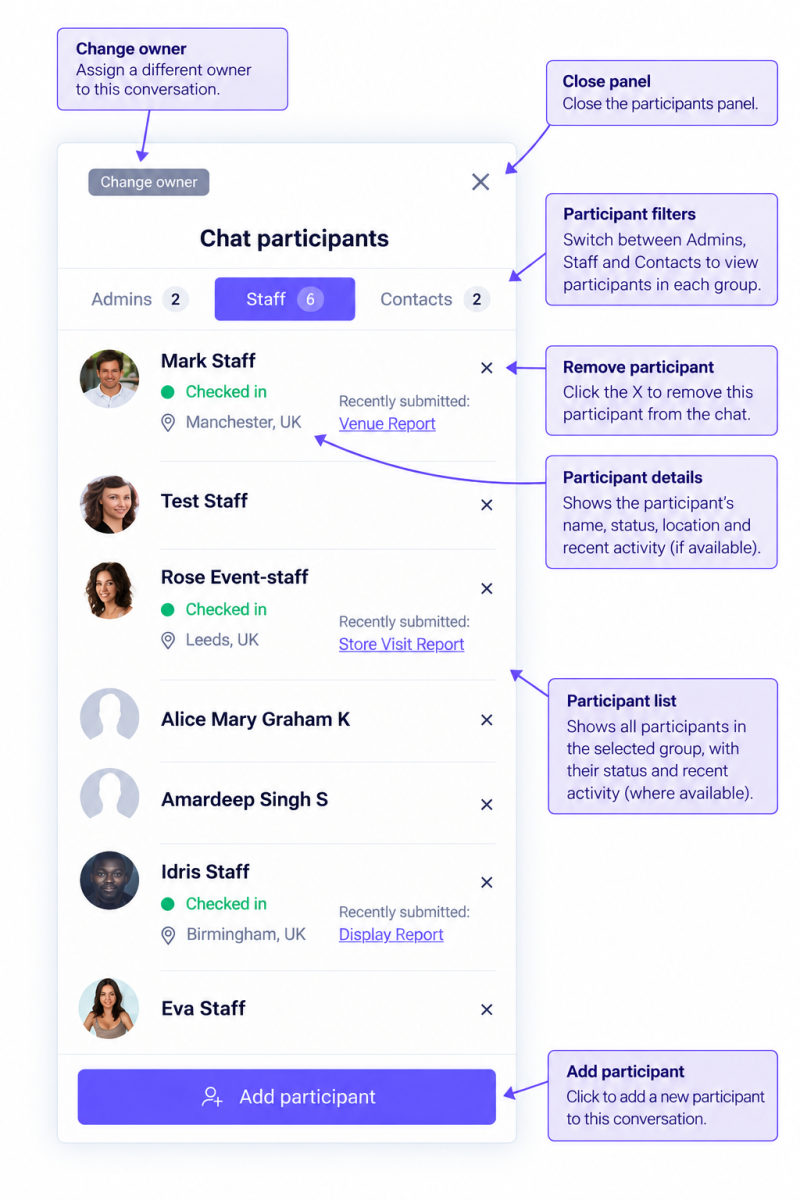
The right sidebar provides an overview of everyone included in the selected conversation, allowing users to view participant information, monitor staff activity and manage chat membership.
Participant Categories
Participants are organised into three categories:
- Admins – Displays administrators included in the conversation.
- Staff – Displays staff members participating in the chat.
- Contacts – Displays additional contacts included in the conversation.
Select any category to view its participants. The number alongside each category indicates the total participants within that group.
Participant Information
Each participant is displayed with their name and profile image, where available.
For staff members, additional information may include:
- Checked In – A green indicator confirms that the staff member is currently checked in. If they are not checked in, no status is displayed.
- Location – Displays the location associated with the staff member's check-in.
- Recently Submitted – Provides a direct link to the staff member's latest submitted report, allowing users to quickly review recent activity.
Managing Participants
- Add Participant – Select the button at the bottom of the sidebar to add additional administrators, staff or contacts to the conversation.
- Remove Participant – Select the X icon alongside a participant to remove them from the chat.
- Change Owner – Select this option at the top of the sidebar to assign a different owner to the conversation.
- Close Panel – Select the X in the top-right corner to hide the participant sidebar and return to a wider chat view.
Available participant information and management options may vary depending on user permissions.
Archiving chats
To archive a chat:
-
Select the conversation you wish to archive from the left sidebar.
-
Click the three-dot menu in the top-right corner of the chat window.
-
Select Archive from the available options.
Once archived, the conversation will be removed from the Active chat list and moved to the Archived section.
Viewing Archived Chats
Select the Archived tab in the left sidebar to view previously archived conversations.
Archived conversations retain their message history, shared images, videos and other media, allowing users to access previous communications whenever required.
Managing Archived Chats
Select an archived conversation to review its contents and previous activity.
Where available, conversations can be restored to the Active chat list using the conversation options.
Archiving helps maintain an organised workspace without losing important communication records.
Access to archived conversations and management options may depend on user permissions.